Forms
XMLUI enables to create forms without the hassle of managing, editing, validating, and saving the information you provide in the UI.
<App>
  <Form data="{{ name: 'Joe', age: 43 }}">
    <FlowLayout>
      <H3>Customer information</H3>
      <FormItem bindTo="name" label="Customer name" />
      <FormItem bindTo="age" label="Age" type="integer" zeroOrPositive="true" />
    </FlowLayout>
  </Form>
</App><App>
<Form data="{{ name: 'Joe', age: 43 }}">
<FlowLayout>
<H3>Customer information</H3>
<FormItem bindTo="name" label="Customer name" />
<FormItem bindTo="age" label="Age" type="integer" zeroOrPositive="true" />
</FlowLayout>
</Form>
</App>Formencapsulates the management of form UI elements and data handling- The
dataproperty holds the form's data FormItemmanages a piece of the databindTospecifies the property name within thedatato bind the corresponding fieldtypedetermines the kind of input field needed for a given piece of data (number field, text area field, radio buttons, etc.)- other properties support styling or validation
Form Layouts
You can use any of XMLUI's layout mechanisms with a
Form. Here is a single-column format using FlowLayout.<App>
<Form data="{
{
firstname: 'Jake',
lastname: 'Hard',
jobTitle: 'janitor',
experience: 'broom'
}
}">
<FlowLayout>
<FormItem label="Firstname" bindTo="firstname" />
<FormItem label="Lastname" bindTo="lastname" />
<FormItem label="Job Title" bindTo="jobTitle" />
<FormItem label="Experience" bindTo="experience" />
</FlowLayout>
</Form>
</App><App>
<Form data="{
{
firstname: 'Jake',
lastname: 'Hard',
jobTitle: 'janitor',
experience: 'broom'
}
}">
<FlowLayout>
<FormItem label="Firstname" bindTo="firstname" />
<FormItem label="Lastname" bindTo="lastname" />
<FormItem label="Job Title" bindTo="jobTitle" />
<FormItem label="Experience" bindTo="experience" />
</FlowLayout>
</Form>
</App>Set each item's width to
50% to create a two-column layout.<App>
<Form
data="{{
firstname: 'Jake',
lastname: 'Hard',
jobTitle: 'janitor',
experience: 'broom'
}}">
<FlowLayout>
<FormItem label="Firstname" bindTo="firstname" width="50%" />
<FormItem label="Lastname" bindTo="lastname" width="50%" />
<FormItem label="Job Title" bindTo="jobTitle" width="50%" />
<FormItem label="Experience" bindTo="experience" width="50%" />
</FlowLayout>
</Form>
</App><App>
<Form
data="{{
firstname: 'Jake',
lastname: 'Hard',
jobTitle: 'janitor',
experience: 'broom'
}}">
<FlowLayout>
<FormItem label="Firstname" bindTo="firstname" width="50%" />
<FormItem label="Lastname" bindTo="lastname" width="50%" />
<FormItem label="Job Title" bindTo="jobTitle" width="50%" />
<FormItem label="Experience" bindTo="experience" width="50%" />
</FlowLayout>
</Form>
</App>Use star sizing to allocate widths flexibly. Here
Firstname and Lastname equally share the space remaining after the 100-px-wide Title.<App>
<Form
data="{{
title: 'Mr.',
firstname: 'Jake',
lastname: 'Hard',
jobTitle: 'janitor',
experience: 'broom'
}}"
onSubmit="(toSave) => toast.success(JSON.stringify(toSave))">
<FlowLayout>
<HStack>
<FormItem label="Title" bindTo="title" width="100px" />
<FormItem label="Firstname" bindTo="firstname" width="*" />
<FormItem label="Lastname" bindTo="lastname" width="*" />
</HStack>
<FormItem label="Job Title" bindTo="jobTitle" width="50%" />
<FormItem label="Experience" bindTo="experience" width="50%" />
</FlowLayout>
</Form>
</App><App>
<Form
data="{{
title: 'Mr.',
firstname: 'Jake',
lastname: 'Hard',
jobTitle: 'janitor',
experience: 'broom'
}}"
onSubmit="(toSave) => toast.success(JSON.stringify(toSave))">
<FlowLayout>
<HStack>
<FormItem label="Title" bindTo="title" width="100px" />
<FormItem label="Firstname" bindTo="firstname" width="*" />
<FormItem label="Lastname" bindTo="lastname" width="*" />
</HStack>
<FormItem label="Job Title" bindTo="jobTitle" width="50%" />
<FormItem label="Experience" bindTo="experience" width="50%" />
</FlowLayout>
</Form>
</App>FormItem
FormItem is an intermediary layer between Form and an input component; it manages the data represented by that component. The type property of a FormItem specifies what input component to render.Checkbox
<App>
  <Form data="{{ option1: true, option2: false, option3: true }}"
    onSubmit="(toSave) => toast.success(JSON.stringify(toSave))">
    <FormItem type="checkbox" bindTo="option1" label="Option #1" labelPosition="end" />
    <FormItem type="checkbox" bindTo="option2" label="Option #2" labelPosition="end" />
    <FormItem type="checkbox" bindTo="option3" label="Option #3" labelPosition="end" />
  </Form>
</App><App>
<Form data="{{ option1: true, option2: false, option3: true }}"
onSubmit="(toSave) => toast.success(JSON.stringify(toSave))">
<FormItem type="checkbox" bindTo="option1" label="Option #1" labelPosition="end" />
<FormItem type="checkbox" bindTo="option2" label="Option #2" labelPosition="end" />
<FormItem type="checkbox" bindTo="option3" label="Option #3" labelPosition="end" />
</Form>
</App>DatePicker
<App>
  <Form
    data="{{ birthDate: '2021-04-08' }}"
    onSubmit="(toSave) => toast.success(JSON.stringify(toSave))">
    <FormItem type="datePicker" bindTo="birthDate" label="Birthdate" />
  </Form>
</App><App>
<Form
data="{{ birthDate: '2021-04-08' }}"
onSubmit="(toSave) => toast.success(JSON.stringify(toSave))">
<FormItem type="datePicker" bindTo="birthDate" label="Birthdate" />
</Form>
</App>File
Use
file to select one or multiple files.<App>
<Form
data="{{ articles: null }}"
onSubmit="(toSave) => toast.success(JSON.stringify(toSave))">
<FormItem type="file" bindTo="articles" label="Articles file" />
</Form>
</App><App>
<Form
data="{{ articles: null }}"
onSubmit="(toSave) => toast.success(JSON.stringify(toSave))">
<FormItem type="file" bindTo="articles" label="Articles file" />
</Form>
</App>Integer
<App>
  <Form
    data="{{ age: 30 }}"
    onSubmit="(toSave) => toast.success(JSON.stringify(toSave))">
    <FormItem type="integer" bindTo="age" label="Age" />
  </Form>
</App><App>
<Form
data="{{ age: 30 }}"
onSubmit="(toSave) => toast.success(JSON.stringify(toSave))">
<FormItem type="integer" bindTo="age" label="Age" />
</Form>
</App>Number
<App>
  <Form
    data="{{ distance: 192.5 }}"
    onSubmit="(toSave) => toast.success(JSON.stringify(toSave))">
    <FormItem type="number" bindTo="distance" label="Distance in miles" />
  </Form>
</App><App>
<Form
data="{{ distance: 192.5 }}"
onSubmit="(toSave) => toast.success(JSON.stringify(toSave))">
<FormItem type="number" bindTo="distance" label="Distance in miles" />
</Form>
</App>RadioGroup
<App>
  <Form
    data="{{ title: 'Mr.' }}"
    onSubmit="(toSave) => toast.success(JSON.stringify(toSave))">
    <FormItem type="radioGroup" bindTo="title" label="Title">
      <Option label="Mr." value="Mr." />
      <Option label="Mrs." value="Mrs." />
      <Option label="Ms." value="Ms." />
      <Option label="Dr." value="Dr." />
    </FormItem>
  </Form>
</App><App>
<Form
data="{{ title: 'Mr.' }}"
onSubmit="(toSave) => toast.success(JSON.stringify(toSave))">
<FormItem type="radioGroup" bindTo="title" label="Title">
<Option label="Mr." value="Mr." />
<Option label="Mrs." value="Mrs." />
<Option label="Ms." value="Ms." />
<Option label="Dr." value="Dr." />
</FormItem>
</Form>
</App>Select
<App>
  <Form
    data="{{ size: 'xs' }}"
    onSubmit="(toSave) => toast.success(JSON.stringify(toSave))">
    <FormItem type="select" bindTo="size" label="Box size">
      <Option label="Extra small" value="xs" />
      <Option label="Small" value="sm" />
      <Option label="Medium" value="md" />
      <Option label="Large" value="lg" />
    </FormItem>
  </Form>
</App><App>
<Form
data="{{ size: 'xs' }}"
onSubmit="(toSave) => toast.success(JSON.stringify(toSave))">
<FormItem type="select" bindTo="size" label="Box size">
<Option label="Extra small" value="xs" />
<Option label="Small" value="sm" />
<Option label="Medium" value="md" />
<Option label="Large" value="lg" />
</FormItem>
</Form>
</App>Switch
<App>
  <Form
    data="{{ showBorder: true, showText: false, hideShadow: true }}"
    onSubmit="(toSave) => toast.success(JSON.stringify(toSave))">
    <FormItem type="switch" bindTo="showBorder" label="Show border" labelPosition="right" />
    <FormItem type="switch" bindTo="showText" label="Show text" labelPosition="right" />
    <FormItem type="switch" bindTo="hideShadow" label="Hide shadow" labelPosition="right" />
  </Form>
</App><App>
<Form
data="{{ showBorder: true, showText: false, hideShadow: true }}"
onSubmit="(toSave) => toast.success(JSON.stringify(toSave))">
<FormItem type="switch" bindTo="showBorder" label="Show border" labelPosition="right" />
<FormItem type="switch" bindTo="showText" label="Show text" labelPosition="right" />
<FormItem type="switch" bindTo="hideShadow" label="Hide shadow" labelPosition="right" />
</Form>
</App>TextBox
<App>
  <Form
    data="{{ name: 'Joe' }}"
    onSubmit="(toSave) => toast.success(JSON.stringify(toSave))">
    <FormItem type="text" bindTo="name" label="Name" />
  </Form>
</App><App>
<Form
data="{{ name: 'Joe' }}"
onSubmit="(toSave) => toast.success(JSON.stringify(toSave))">
<FormItem type="text" bindTo="name" label="Name" />
</Form>
</App>TextArea
<App>
  <Form
    data="{{ description: 'This is a description' }}"
    onSubmit="(toSave) => toast.success(JSON.stringify(toSave))">
    <FormItem type="textarea" bindTo="description" label="Description" />
  </Form>
</App><App>
<Form
data="{{ description: 'This is a description' }}"
onSubmit="(toSave) => toast.success(JSON.stringify(toSave))">
<FormItem type="textarea" bindTo="description" label="Description" />
</Form>
</App>Custom
You can create a custom input component that uses the XMLUI forms infrastructure.
<App>
  <Form
    data="{{ userAvailable: false }}"
    onSubmit="(toSave) => toast.success(JSON.stringify(toSave))">
    <FormItem bindTo="userAvailable">
      <HStack>
        <Button
          label="Toggle"
          backgroundColor="{$value === false ? 'red' : 'green'}"
          onClick="$setValue(!$value)"
        />
      </HStack>
    </FormItem>
  </Form>
</App><App>
<Form
data="{{ userAvailable: false }}"
onSubmit="(toSave) => toast.success(JSON.stringify(toSave))">
<FormItem bindTo="userAvailable">
<HStack>
<Button
label="Toggle"
backgroundColor="{$value === false ? 'red' : 'green'}"
onClick="$setValue(!$value)"
/>
</HStack>
</FormItem>
</Form>
</App>$value represents the current value of the component. $setValue changes the value.Provide data
You can define a
Forms data structure and initial values directly.<Form data="{{ name: 'Joe', age: 43 }}" />Or via an API endpoint.
<Form data="/path/to/resource" />Use the
bindTo property to access fields in the structure.<Form data="{{ name: 'Joe' }}">
<FormItem bindTo="name" />
</Form>Refer to data
The
$data variable holds all the form's data. You can use values in $data to control FormItem properties. Here the Switchs value sets the enabled property of a FormItem.<App>
<Form data="{{ isEnabled: true, name: 'Joe' }}">
<FormItem label="Enable name" bindTo="isEnabled" type="switch" />
<FormItem enabled="{$data.isEnabled}" label="Name" bindTo="name" />
</Form>
</App><App>
<Form data="{{ isEnabled: true, name: 'Joe' }}">
<FormItem label="Enable name" bindTo="isEnabled" type="switch" />
<FormItem enabled="{$data.isEnabled}" label="Name" bindTo="name" />
</Form>
</App>Other components in the form can reference the form's data too. Here the
Text updates reactively when input values change.<App>
<Form data="{{ firstname: 'John', lastname: 'Doe' }}">
<FormItem label="Firstname" bindTo="firstname" />
<FormItem label="Lastname" bindTo="lastname" />
<Text>Full name: {$data.firstname} {$data.lastname}</Text>
</Form>
</App><App>
<Form data="{{ firstname: 'John', lastname: 'Doe' }}">
<FormItem label="Firstname" bindTo="firstname" />
<FormItem label="Lastname" bindTo="lastname" />
<Text>Full name: {$data.firstname} {$data.lastname}</Text>
</Form>
</App>You can drill into
$data to reference nested fields.<App>
<Form
data="{{
name: 'John smith',
address: { street: '96th Ave N', city: 'Seattle', zip: '98005' }
}}"
onSubmit="(toSave) => toast.success(JSON.stringify(toSave))">
<FormItem bindTo="name" label="Name" />
<FormItem bindTo="address.street" label="Street" />
</Form>
</App><App>
<Form
data="{{
name: 'John smith',
address: { street: '96th Ave N', city: 'Seattle', zip: '98005' }
}}"
onSubmit="(toSave) => toast.success(JSON.stringify(toSave))">
<FormItem bindTo="name" label="Name" />
<FormItem bindTo="address.street" label="Street" />
</Form>
</App>Validate data
The
Form handles client-side validation, reporting issues interactively. Server-side validation happens when the form data is sent to the server. The Form handles the server's response and displays it in a summary or below input fields.These are the
FormItem validation properties.minLength
<App>
  <Form data="{{ name: 'Billy Bob' }}">
    <FormItem bindTo="name" minLength="10" label="minLength" />
  </Form>
</App><App>
<Form data="{{ name: 'Billy Bob' }}">
<FormItem bindTo="name" minLength="10" label="minLength" />
</Form>
</App>Try submitting with fewer than 10 characters.
maxLength
<App>
  <Form data="{{ name: 'Billy Bob' }}">
    <FormItem bindTo="name" maxLength="11" label="maxLength" />
  </Form>
</App><App>
<Form data="{{ name: 'Billy Bob' }}">
<FormItem bindTo="name" maxLength="11" label="maxLength" />
</Form>
</App>Try entering more than 11 characters.
minValue
<App>
  <Form data="{{ age: 30 }}">
    <FormItem bindTo="age" type="number" minValue="32" label="minValue" />
  </Form>
</App><App>
<Form data="{{ age: 30 }}">
<FormItem bindTo="age" type="number" minValue="32" label="minValue" />
</Form>
</App>Try entering a number smaller than 32.
maxValue
<App>
  <Form data="{{ age: 30 }}" >
    <FormItem bindTo="age" type="number" maxValue="29" label="maxValue" />
  </Form>
</App><App>
<Form data="{{ age: 30 }}" >
<FormItem bindTo="age" type="number" maxValue="29" label="maxValue" />
</Form>
</App>Try entering a number larger than 32.
pattern
Evaluate predefined regex patterns: "email", "url", or "phone".
See the pattern property of
FormItem.regex
Evaluate a custom regex pattern.
<App>
  <Form data="{{ password: 'hello' }}">
    <!-- Only all uppercase letters are accepted -->
    <FormItem bindTo="password" regex="/^[A-Z]+$/" label="regex" />
  </Form>
</App><App>
<Form data="{{ password: 'hello' }}">
<!-- Only all uppercase letters are accepted -->
<FormItem bindTo="password" regex="/^[A-Z]+$/" label="regex" />
</Form>
</App>Compound validation
You can use multiple validations.
<App>
  <Form data="{{ site: 'http://www.example.com' }}">
    <FormItem bindTo="site" minLength="10" maxLength="30"
      pattern="url" label="Multiple Validations" />
  </Form>
</App><App>
<Form data="{{ site: 'http://www.example.com' }}">
<FormItem bindTo="site" minLength="10" maxLength="30"
pattern="url" label="Multiple Validations" />
</Form>
</App>Validation-specific severity
By default, all validations have a severity level of "error". You can set whether a validation should have a level of "warning" or "error".
<App>
  <Form data="{{ mobile: '+13456123456', website: 'http://www.blogsite.com' }}" >
    <FormItem
      bindTo="mobile"
      pattern="phone"
      patternInvalidSeverity="warning"
      label="mobilePattern" />
    <FormItem
      bindTo="website"
      pattern="url"
      patternInvalidSeverity="error"
      label="websitePattern" />
  </Form>
</App><App>
<Form data="{{ mobile: '+13456123456', website: 'http://www.blogsite.com' }}" >
<FormItem
bindTo="mobile"
pattern="phone"
patternInvalidSeverity="warning"
label="mobilePattern" />
<FormItem
bindTo="website"
pattern="url"
patternInvalidSeverity="error"
label="websitePattern" />
</Form>
</App>Validation-specific messages
Predefined validations have built-in messages that you can change.
<App>
  <Form data="{{ age: 20 }}" >
    <FormItem
      bindTo="age"
      type="number"
      minValue="21"
      rangeInvalidMessage="The given age is too low!"
      label="Invalid Message" />
  </Form>
</App><App>
<Form data="{{ age: 20 }}" >
<FormItem
bindTo="age"
type="number"
minValue="21"
rangeInvalidMessage="The given age is too low!"
label="Invalid Message" />
</Form>
</App>Server-side validation
The
Form component can receive and display a server-side validation response. Field related issues are shown just like client-side validation errors, removed when a field is edited. Non-field related issues are displayed in a validation summary view.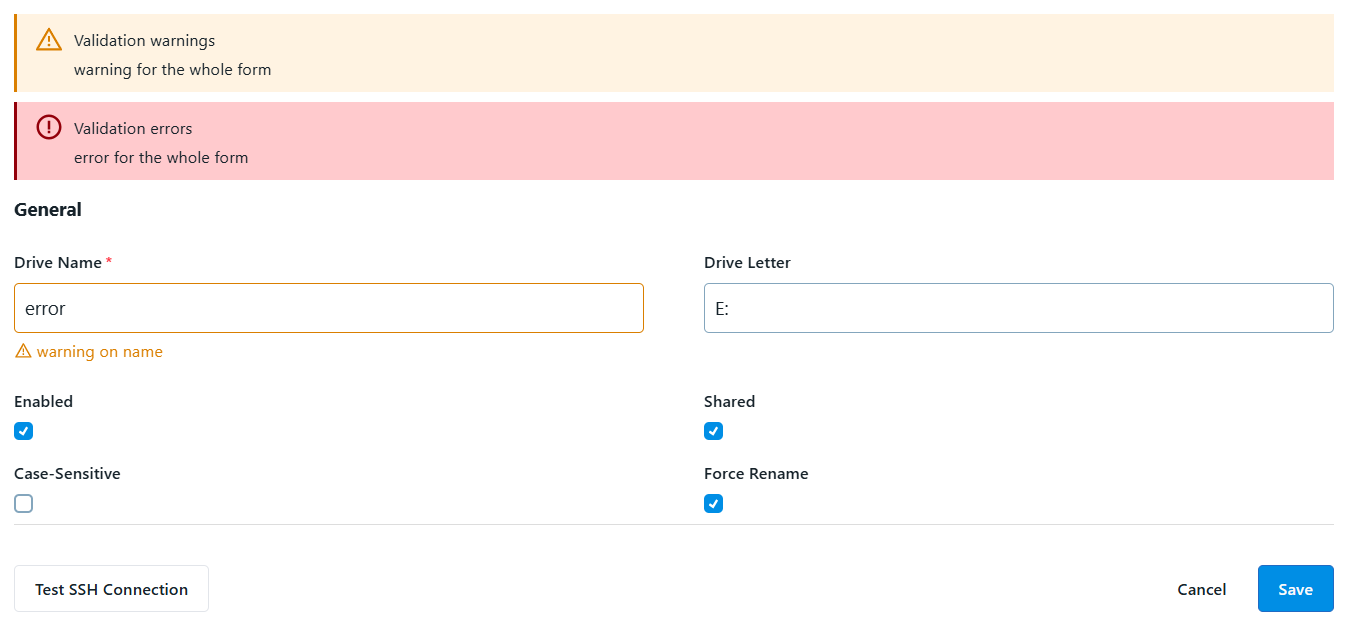
Submit data
By default the
Form component provides a submit button to save the modified data.<App>
<Form onSubmit="toast('Saved!')" />
</App><App>
<Form onSubmit="toast('Saved!')" />
</App>The
onSubmit accepts either a block of code or function. When you use a function it receives data in a parameter; in this example it's called toSave but you can use any name. The function can be defined inline, in a code-behind file, or in index.html attached to the global window variable. See the Code chapter for details.<App>
<Form
data="{{ name: 'Joe', age: 43 }}"
onSubmit="(d) => toast(JSON.stringify(d))"
>
<FormItem label="name" bindTo="name" />
<FormItem label="age" bindTo="age" />
</Form>
</App><App>
<Form
data="{{ name: 'Joe', age: 43 }}"
onSubmit="(d) => toast(JSON.stringify(d))"
>
<FormItem label="name" bindTo="name" />
<FormItem label="age" bindTo="age" />
</Form>
</App>To submit via an
APICall, use the event helper tag to bridge between the form and the API. The Forms data attribute maps to the APICall's $param context variable. A Toast popup reports success or error.<App>
<Form data="{{ name: 'Joe', age: 43 }}">
<event name="submit">
<APICall
url="/api/contacts"
method="POST"
body="{$param}" />
</event>
<FormItem bindTo="name" label="name" />
<FormItem bindTo="age" label="age" />
</Form>
</App>Form in ModalDialog
ModalDialog supports
Form as a first-class citizen component. When a Form nests directly in a ModalDialog, the dialog's button row is replaced with the form's own button row. When form submission is successful, the dialog closes.